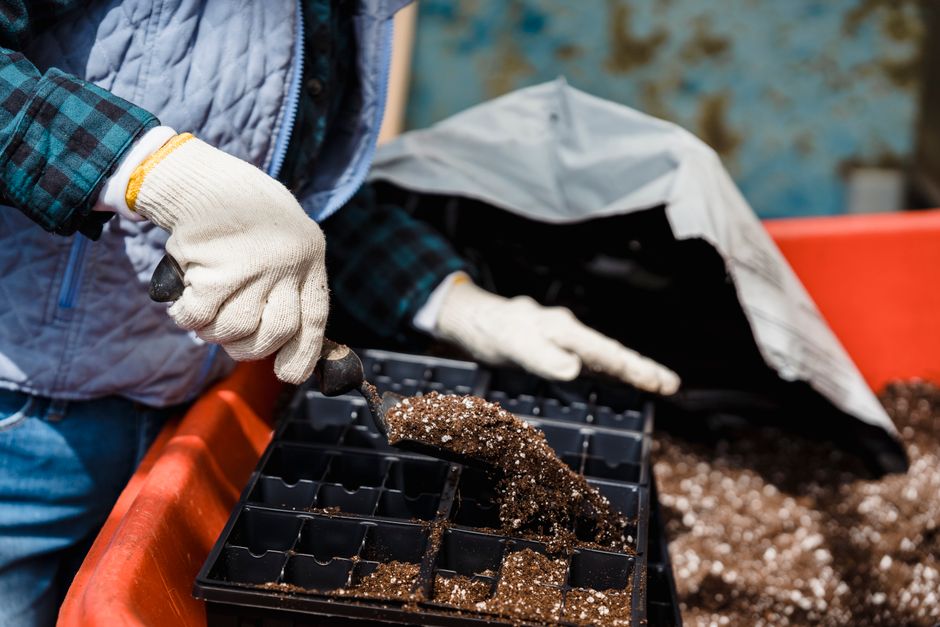
How to Transplant Seedlings: Your MicroVeg Guide to Success
You've nurtured your tiny seeds into strong, young seedlings. Now comes the exciting next step: transplanting them. Transplanting seedlings means carefully moving them from their small starting containers to larger pots, a final soil garden, or a hydroponic system. It's a crucial step that gives your plants the space, nutrients, and environment they need to continue growing big and strong. This MicroVeg guide will walk you through everything you need to know to transplant your indoor seedlings with confidence and prevent common setbacks.
Why Is Transplanting Seedlings Important?
Transplanting seedlings is important because it provides them with more room for root development, access to fresh nutrients, and allows them to grow into mature plants. Starting seeds in small trays or cells is efficient, but young plants quickly outgrow these confined spaces, becoming root-bound and struggling to find enough water and food.
Moving seedlings to a larger container or directly into your hydroponic system gives their roots ample space to spread out, which is vital for nutrient uptake and stability. It also refreshes their growing medium, providing a new supply of essential elements they need for continued vigorous growth. For those growing hydroponically, transplanting means moving from a seed-starting plug to a net pot within your system, giving the roots direct access to the nutrient solution.
When Is the Best Time to Transplant Seedlings?
The best time to transplant seedlings is when they have developed two to three sets of true leaves, look robust, and their roots are just beginning to fill their current container. True leaves are the second set of leaves that appear, distinct from the initial round, which are called cotyledons.
Don't wait too long to transplant. If seedlings become severely root-bound, they can experience more stress during the move, which makes recovery harder. Healthy, vigorous seedlings that are still actively growing are much more resilient. You might also notice roots starting to emerge from the drainage holes of their current cell, which is a clear sign they're ready for more room. For a deeper look into the timing, check out our guide on When to Pot Up Seedlings.
What Do You Need to Transplant Seedlings?
Gathering your tools before you begin makes the transplanting process smoother and less stressful for your plants. Having everything ready minimizes the time your seedlings are exposed to the air and not settled in their new home.
- New containers or hydroponic system: Choose pots that are appropriately sized for the next stage of growth, or have your hydroponic net pots and system ready.
- Appropriate growing medium: Use a fresh, sterile seed-starting mix for soil-based transplants, or rockwool cubes, coco coir, or clay pebbles for hydroponic systems.
- Small trowel, dibbler, or popsicle stick: These tools help gently loosen and lift seedlings without damaging their delicate stems or roots.
- Watering can with a gentle spout: For thoroughly watering the new medium immediately after transplanting.
- Gentle nutrient solution (for hydroponics) or very mild fertilizer (for soil): If your new medium isn't pre-fertilized, a diluted nutrient solution can help ease the transition.
How Do You Transplant Seedlings Successfully?
To transplant seedlings successfully, carefully remove the seedling from its current container, handle the roots gently, place it into a pre-prepared new spot, and water it immediately to settle the growing medium. Taking your time and being gentle are key to minimizing stress on your young plants.
Here are the steps for a smooth transplant:
- Prepare the new home: Fill your larger pots with fresh potting mix, making a small hole in the center large enough for the seedling's root ball. If moving to hydroponics, ensure your net pots are ready with your chosen inert medium, and the system's reservoir has a pre-mixed, diluted nutrient solution.
- Water existing seedlings: Water your seedlings thoroughly about an hour before transplanting. This makes the soil or growing medium more cohesive, reducing root disturbance when you remove the plant.
- Gently loosen the seedling: Using your small trowel or a dull knife, carefully run it around the inside edge of the seedling's current container. This helps separate the root ball from the pot walls.
- Support the seedling: Invert the seedling tray or pot, placing your hand over the top with the seedling stem gently cradled between your fingers. A gentle squeeze of the pot or a light tap on the bottom should release the seedling and its root ball. Always handle seedlings by their leaves, not their stems, as stems are easily bruised or broken.
- Carefully lift the seedling: Once loose, gently lift the entire seedling, trying to keep the root ball as intact as possible. Avoid pulling on the stem.
- Place into the new spot: Center the seedling in the prepared hole in the new pot or net pot. Ensure it's at the same depth it was previously, or slightly deeper if it's a leggy seedling (but be careful not to bury the cotyledons). For hydroponics, position the root ball so it will reach the nutrient solution.
- Gently backfill or secure: For soil, gently backfill around the root ball with fresh potting mix, lightly firming it with your fingers to remove large air pockets. For hydroponics, ensure the net pot is secured and the roots are pointing downwards.
- Water immediately: Water the newly transplanted seedling thoroughly. This settles the new growing medium around the roots, eliminating air pockets and providing essential hydration. For hydroponic systems, ensure the roots are in contact with the nutrient solution. Always keep electrical components of your growing system, like timers and pumps, away from water spills to prevent hazards.
How Can You Prevent Transplant Shock?
Transplant shock occurs when seedlings struggle to adjust to their new environment, causing symptoms like wilting, yellowing, or stunted growth. You can prevent it by being gentle, maintaining consistent conditions, and providing a stable transition. Young plants are sensitive to changes in light, temperature, and humidity, and damage to their root system can impede their ability to absorb water and nutrients.
Here are key ways to minimize transplant shock:
- Be gentle: The most crucial step is to handle the root ball and stem with extreme care. Any damage to the roots makes it harder for the plant to recover.
- Water thoroughly: Water before and immediately after transplanting to ensure the roots are hydrated and the soil or medium settles around them.
- Maintain consistent conditions: Try to keep the light, temperature, and humidity levels similar to what the seedlings were used to for the first few days after transplanting.
- Avoid direct, intense light: For the first day or two, you might want to move transplanted seedlings to a slightly less intense light source, or shorten their light cycle, allowing them to recover from the stress.
- Harden off (if going outdoors): If your ultimate goal is to move the seedlings outdoors, remember to harden them off gradually after transplanting to their larger indoor pots. Read our guide on How to Harden Off Seedlings for detailed steps.
Final Thoughts
Transplanting seedlings is a simple yet vital step in growing healthy plants indoors, preparing them for a life of abundant growth. By understanding when and how to transplant seedlings, and taking precautions against transplant shock, you'll set your garden up for success. Keep practicing, and your indoor garden will thrive. Explore more MicroVeg guides for all your small-space growing needs.
Frequently Asked Questions
What is transplant shock?
Transplant shock is a period of stress a plant experiences after being moved to a new growing environment, often resulting in wilting, slowed growth, or yellowing leaves as it adjusts.
Can I transplant seedlings directly into a hydroponic system?
Yes, you can transplant seedlings directly into a hydroponic system once they have developed a robust root system and two to three sets of true leaves, using a suitable inert medium like rockwool or coco coir.
How long after transplanting should I fertilize?
If you transplant into fresh potting mix or a new hydroponic solution, your seedlings should have enough nutrients for a while. For soil, wait a week or two before introducing a very diluted, mild fertilizer; for hydroponics, ensure your solution is at a diluted strength for young plants.
What kind of soil should I use for repotting seedlings?
For repotting seedlings, use a sterile, well-draining potting mix specifically formulated for young plants. Avoid heavy garden soil, which can compact and hinder root development.
Explore More Plant Care Guides
 Plant Care
Pruning Chrysanthemums for Longer Indoor Blooms
Discover effective pruning techniques for chrysanthemums to ensure more vibrant and continuous blooms in your indoor garden.
 Plant Care
How to Grow Spinach Indoors: Fresh Leaves Year-Round
Learn how to grow fresh spinach indoors all year long, perfect for small spaces and a continuous harvest.
 Plant Care
Indoor Chrysanthemum Care: Avoid This Common Mistake
Bringing chrysanthemums indoors for fall decor is popular, but many home growers make a key mistake that causes these vibrant plants to quickly decline.