Transplant Seedlings Indoors: Grow Stronger Plants
Transplant Seedlings Indoors: Grow Stronger Plants
You've done the exciting work of starting seeds indoors. Now, as those tiny sprouts grow, they'll need more room to thrive. Transplanting seedlings indoors is the process of moving young plants from their initial small seed-starting cells into larger containers, giving them more room to grow before they mature or move to a permanent home. This crucial step helps prevent them from becoming root-bound and supports robust development, ensuring they get the nutrients and space they need for continued healthy growth in your indoor garden.
This guide will walk you through everything you need to know about successfully transplanting your indoor seedlings. We'll cover when to make the move, what supplies are essential, and how to handle your delicate young plants with care. With the right technique, you can minimize stress and set your plants up for a healthy, productive life.
When Should You Transplant Seedlings Indoors?
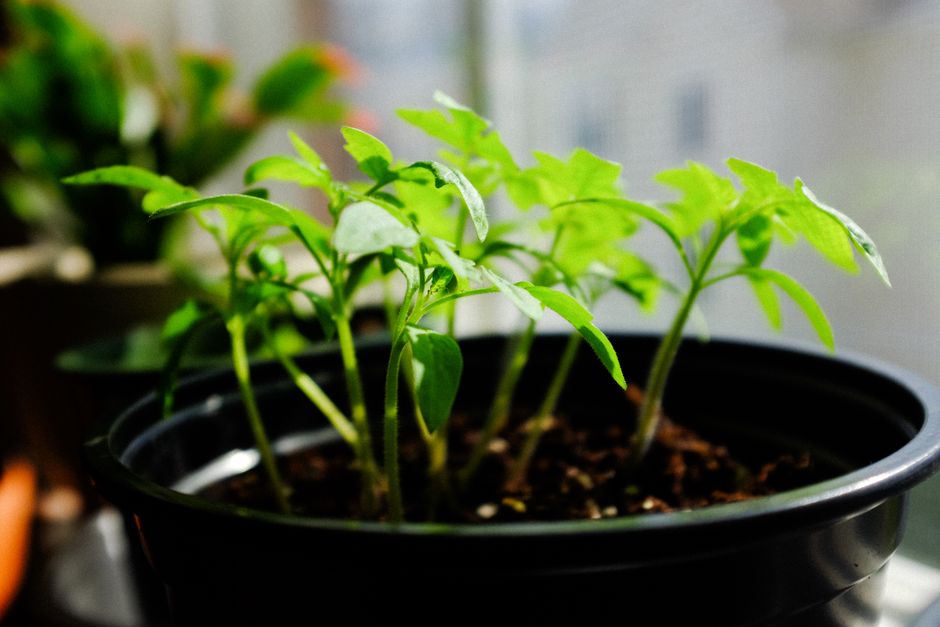
You should transplant seedlings indoors when they have developed their first set of true leaves, look crowded in their current container, or show signs of nutrient deficiency. The first leaves to emerge are called cotyledons, and they are usually round or oval. True leaves, however, will look like miniature versions of the mature plant's leaves and are a key indicator that your seedling is ready for a new home.
Another clear sign is when roots start to emerge from the drainage holes of the seed-starting tray. This means your plant is becoming root-bound, which can stunt its growth and make it harder for the roots to absorb water and nutrients. Crowded seedlings are also more susceptible to disease and competition for resources, so giving them individual space is important.
Sometimes, seedlings might start to look pale or yellow despite regular watering. This can be a sign they've used up all the available nutrients in their small seed-starting mix and need fresh soil with more nutrition. If your seedlings are also looking thin and stretched, often called leggy, it might be a good time to transplant them into deeper pots, burying some of the stem to encourage stronger growth. Learn more about how to address this issue in our guide on Fixing Leggy Seedlings.
What Supplies Do You Need for Transplanting Seedlings?
For successful indoor seedling transplanting, you will need clean larger pots, a fresh, sterile potting mix, and a small tool like a dibber or spoon for gentle handling. Having all your supplies ready before you start makes the process much smoother and reduces stress on your young plants.
- Larger Pots: Choose pots that are one or two sizes larger than your current seed cells. For most seedlings, a 3-4 inch pot is a good next step. Make sure they have drainage holes.
- Fresh Potting Mix: Use a high-quality, sterile potting mix specifically designed for seedlings or general houseplants. Avoid using garden soil, as it can contain pests, diseases, and may not drain well indoors.
- Small Trowel, Spoon, or Dibber: These tools help you gently loosen soil and create holes without damaging delicate roots. A simple kitchen spoon works perfectly.
- Watering Can or Spray Bottle: You'll need to water the seedlings before and immediately after transplanting. A gentle stream or mist is best.
- Labels (Optional but Recommended): If you're transplanting different types of plants, labels help you keep track of what's what.
- Grow Lights: Adequate light is crucial for seedlings, especially after transplanting. Ensure you have your grow light setup ready to provide consistent light. Understanding your LED Grow Light Schedule is key for happy plants.
How Do You Gently Transplant Seedlings?
To gently transplant seedlings, first prepare their new pots with fresh soil, then carefully loosen the seedling from its original container, disturbing the roots as little as possible before placing it into the new pot and watering it in. Taking your time and being gentle is key to minimizing transplant shock.
- Prepare New Pots: Fill your chosen larger pots with fresh potting mix, leaving about an inch of space from the rim. Make a small hole in the center of the soil, large enough to accommodate the seedling's root ball.
- Water Seedlings: Water your seedlings thoroughly a few hours before transplanting. Moist soil helps the root ball stay together and makes it easier to remove the seedling from its current container.
- Loosen the Soil: Gently press on the bottom or sides of the current container to loosen the soil around the seedling. If using a tray with individual cells, you might be able to push the seedling up from the bottom.
- Handle by Leaves, Not Stem: Carefully remove the seedling from its original container. Always hold the seedling by one of its true leaves, never by the stem, as stems are very fragile and easily damaged.
- Place Seedling: Carefully lower the seedling into the prepared hole in the new pot. The top of the root ball should be level with the surrounding soil. If your seedling is leggy, you can bury part of the stem to encourage new root growth along the buried portion.
- Backfill and Gently Firm: Gently backfill the hole with potting mix, lightly firming the soil around the seedling's base to remove any large air pockets. Do not pack the soil too tightly, as roots need air.
- Water Immediately: Give the newly transplanted seedling a gentle watering to settle the soil and provide immediate hydration. This also helps eliminate air pockets around the roots.
Always ensure your grow lights and electrical timers are safely positioned away from water spills to prevent hazards while working with your plants.
Preventing Transplant Shock
To prevent transplant shock, keep roots intact during the move, water immediately after transplanting, and provide consistent, gentle care with appropriate light and temperature. Transplant shock happens when plants experience stress during the move, leading to wilting, yellowing, or stunted growth. Young plants are especially vulnerable.
Beyond gentle handling, ensure the new pot isn't excessively large, as too much empty soil can retain too much moisture, leading to root problems. After watering, consider giving your seedlings a slightly less intense light environment for the first day or two to help them recover, then gradually move them back to their optimal light conditions. Maintaining stable temperatures and avoiding sudden drafts will also help them adjust to their new surroundings.
Post-Transplant Care for Stronger Plants
After transplanting, give your young plants a few days to recover in a slightly shadier spot before returning them to full light, and maintain consistent watering and appropriate temperatures to support their growth. This recovery period is vital for minimizing transplant shock and encouraging new root development.
For the first 24-48 hours, a slightly dimmer light or a few hours less light exposure can help plants adjust. Gradually increase light intensity and duration over the next few days. Keep the potting mix consistently moist but never soggy. Overwatering can be just as damaging as underwatering, especially to newly transplanted roots.
Maintain a stable indoor temperature, avoiding extreme fluctuations that can stress delicate plants. Most seedlings thrive in temperatures similar to what they experienced during germination. Avoid fertilizing immediately after transplanting. The fresh potting mix usually contains enough nutrients for the first week or two. Once your plants show signs of new growth, you can begin feeding them with a very dilute nutrient solution, following product instructions carefully.
Final Thoughts
Learning how to successfully transplant seedlings indoors is a vital skill for any home grower, moving your plants from tiny sprouts to robust, productive individuals. By following these steps and providing gentle care, you can ensure your plants overcome the move with minimal stress, setting them on a path to healthy, vigorous growth. Explore more MicroVeg guides for tips on growing your best indoor garden.
Frequently Asked Questions
How long do seedlings stay in seed starting trays?
Seedlings typically stay in seed starting trays for 2-4 weeks, or until they develop their first set of true leaves and begin to look crowded.
Can you transplant seedlings into a much larger pot?
It's best to transplant seedlings into pots only one or two sizes larger, rather than a much larger pot, to prevent overwatering and promote healthy root development.
What are the signs of transplant shock?
Signs of transplant shock include sudden wilting, yellowing leaves, stunted growth, or a general droopy appearance of the plant after being moved.
Should I fertilize immediately after transplanting?
No, you should avoid fertilizing immediately after transplanting. The fresh potting mix usually provides enough nutrients for the first 1-2 weeks, and fertilizing too soon can stress the plant.
Explore More Plant Care Guides
 Plant Care
Pruning Chrysanthemums for Longer Indoor Blooms
Discover effective pruning techniques for chrysanthemums to ensure more vibrant and continuous blooms in your indoor garden.
 Plant Care
How to Grow Spinach Indoors: Fresh Leaves Year-Round
Learn how to grow fresh spinach indoors all year long, perfect for small spaces and a continuous harvest.
 Plant Care
Indoor Chrysanthemum Care: Avoid This Common Mistake
Bringing chrysanthemums indoors for fall decor is popular, but many home growers make a key mistake that causes these vibrant plants to quickly decline.